Nodejs + Express Swagger 제대로 알고 쓰자!

안녕하세요. 개발까마귀입니다.
오늘 알려드릴거는 Nodejs Express Swagger 문서 만들기입니다.
제목으로 보시다시피 많은 블로그 예제 또는 프로젝트를 보면 Swagger를 사용할 때 유지보수나 가독성으로 매우 안좋게 Swagger를 쓰는거같습니다.
예를 들어 .yml으로 Swagger 문서를 작성한다거나 또는 .json으로 하나에 다 넣어서 작성한다거나 등 Swagger를 활용합니다.
예) .yml
/**
 * @swagger
 *  /test:
 *    get:
 *      tags:
 *      - test
 *      description: 테스트 API
 *      produces:
 *      - application/json
 *      parameters:
 *        - in: query
 *          name: category
 *          required: false
 *          schema:
 *            type: integer
 *            description: 테스트
 *      responses:
 *       201:
 *        description: 테스트 데이터 생성 성공
 */
router.post("/test", () => {});
위가 .yml 인데 계속 API 작업을 하다보면 데이터 형식이 복잡한다거나 하면 .yml으로는 작성이 매우 힘듭니다.
API 문서 만들다가 하루가 다 갈수도있죠
그래서 저는 이러한 불편함을 겪고 .yml, .json이 아닌 JS 코드로 해서 빠르고 쉽게 API 문서를 만들수있도록 Swagger를 이용해서 하나의 hanlder 코드를 만들었습니다. 자세한 이야기는 아래 코드를 보면서 하시죠 ㅎㅎ
*우선 코드를 보기를 앞서 이 블로그 핵심은 Swagger + Express를 통해서 JS 코드로 API 문서 만드는거에 초점을 두기 때문에 모듈 설명 및 코드 설명은 자세하게 다루지 않습니다. *
실습
프로젝트 세팅
먼저 프로젝트 세팅을 해야됩니다.
필요한 모듈은
    "express": "^4.18.1",
    "swagger-jsdoc": "^6.2.1",
    "swagger-ui-express": "^4.4.0"
위 3개를 설치를 해야합니다.
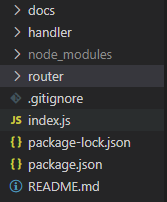
프로젝트 구조

docs: 저희의 JS코드로 만들어진 API 문서가 있는 폴더입니다.
hanlder: 핸들러는 복잡 프로세스 처리에 대한 의미로 아시면 됩니다. 즉 SwaggerHanlder가 있는 곳 입니다.
router: router들이 있는 폴더 입니다.
폴더 구조는 간단합니다.
index.js
const express = require("express");
const app = express();
const indexRouter = require("./router/index");

function init() {
  app.get("/", (req, res) => res.send("Welcome Swagger Hanlder"));
  indexRouter(app);

  app.listen(3000, () => console.log("server start port 3000"));
}

init();
docs/api/user/signup.js
module.exports = {
  "/user/sing-up": {
    post: {
      tags: ["User"],
      summary: "사용자 회원가입",
      description: "사용자 회원가입(email, password, phone)",
      requestBody: {
        content: {
          "application/json": {
            schema: {
              properties: {
                email: {
                  type: "string",
                  description: "사용자 이메일",
                  example: "aaa@example.com",
                },
                phone: {
                  type: "string",
                  description: "사용자 전화번호",
                  example: "000-0000-0000",
                },
                password: {
                  type: "string",
                  description: "사용자 패스워드",
                  example: "123456789",
                },
              },
            },
          },
        },
      },
      responses: {
        201: {
          description: "사용자 회원가입 성공",
          content: {
            "application/json": {
              schema: {
                type: "object",
                properties: {
                  result: {
                    type: "object",
                    properties: {
                      code: {
                        type: "number",
                        description: "code",
                        example: 201,
                      },
                      message: {
                        type: "string",
                        description: "성공 메시지",
                        example: "success",
                      },
                      data: {
                        type: "array",
                        description: "data",
                        example: [],
                      },
                    },
                  },
                },
              },
            },
          },
        },
      },
    },
  },
};
docs/api/user/index.js
const signUp = require("./singup");

module.exports = {
  ...signUp,
};
우선 docs/api/user/singup.js는 JS코드로 만들은 API 문서입니다. docs 폴더 구조를 보시다 시피
docs/api/user 폴더에 index.js와 singup.js 파일이 공존합니다. 즉 signup.js API 문서파일 말고 signin.js API 문서가 있을수도 있다는거죠 이러한 API 문서파일을 하나로 모으는 역할을 하는게 index.js 입니다. 즉 각각의 컴포넌트 API 문서 폴더들은 index 파일과 API 문서파일이 공존해야한다는거죠
example
docs/api/user/index.js
signup.js
signin.js
docs/api/post/index.js
write.js
read.js
위와 같은 식으로 구성됩니다.
위에 index들은 각 컴포넌트별로의 문서를 모은 index이지 전체 컴포넌트의 API 문서를 모은 index가 아닙니다.
그리고 여기서 주의깊게 봐야할 점은 ...signUp 입니다. 스프레드 연산자를 쓴 이유는 객체의 Depth(깊이) 때문입니다.
스프레드 연산자는 배열 또는 객체를 한번 풀어주는 역할 즉 Depth 한 단계 낮추는 역할을 합니다. Depth가 한단계라도 깊어진다면 API 문서가 화면에 나오지 않게됩니다.
docs/index.js
const swaggerUI = require("swagger-ui-express");
const swaggerJsDoc = require("swagger-jsdoc");
const Swagger = require("../handler/swagger");
const user = require("../docs/api/user/index");

class ApiDocs {
  #apiDocOption;
  #swagger;

  constructor() {
    this.#apiDocOption = {
      ...user,
    };

    this.#swagger = new Swagger();
  }

  init() {
    this.#swagger.addAPI(this.#apiDocOption);
  }

  getSwaggerOption() {
    const { apiOption, setUpoption } = this.#swagger.getOption();

    const specs = swaggerJsDoc(apiOption);

    return {
      swaggerUI,
      specs,
      setUpoption,
    };
  }
}

module.exports = ApiDocs;
전체 컴포넌트의 API 문서를 모으는 역할을 하는것이 docs/index.js 입니다.
이 파일의 역할은 전체 컴포넌트의 API 문서를 모으는 역할도 하지만 이렇게 모인 API 문서를 SwaggerHanlder가 가공할수있도록 넘겨주는 역할 및 가공한 문서 데이터를 받아서 반환까지 해주는 역할을 합니다.
즉 중간다리 역할을 하는 것이죠, 여기서도 마찬가지로 스프레드 연산자를 통해서 #apiDocsOption 에 넣어줘야 합니다.
handler/swagger.js
const swaggerOpenApiVersion = "3.0.0";

const swaggerInfo = {
  title: "Swagger-Hanlder",
  version: "0.0.1",
  description: "",
};

const swaggerTags = [
  {
    name: "User",
    description: "사용자 API",
  },
];

const swaggerSchemes = ["http", "https"];

const swaggerSecurityDefinitions = {
  ApiKeyAuth: {
    type: "apiKey",
    name: "Authorization",
    in: "header",
  },
};

const swaggerProduces = ["application/json"];

const swaggerServers = [
  {
    url: "http://localhost:3000",
    description: "로컬 서버",
  },
];

const swaggerSecurityScheme = {
  bearerAuth: {
    type: "http",
    scheme: "bearer",
    bearerFormat: "Token",
    name: "Authorization",
    description: "인증 토큰 값을 넣어주세요.",
    in: "header",
  },
};

const swaggerComponents = {
  JWT_ERROR: {
    description: "jwt token Error",
    type: "object",
    properties: {
      401: {
        type: "Error token 변조 에러",
      },
    },
  },
  SERVER_ERROR: {
    description: "SERVER ERROR",
    type: "object",
    properties: {
      500: {
        type: "Internal Error",
        code: 800,
      },
    },
  },
  DB_ERROR: {
    description: "SERVER DB ERROR",
    type: "object",
    properties: {
      500: {
        type: "DB ERROR",
        code: 500,
      },
    },
  },
};

class Swagger {
  static #uniqueSwaggerInstance;
  #paths = [{}];
  #option = {};
  #setUpOption = {};

  /**
   *
   * @returns {Swagger}
   */
  constructor() {
    if (!Swagger.#uniqueSwaggerInstance) {
      this.#init();
      Swagger.#uniqueSwaggerInstance = this;
    }

    return Swagger.#uniqueSwaggerInstance;
  }

  #init() {
    this.#option = {
      definition: {
        openapi: swaggerOpenApiVersion,
        info: swaggerInfo,
        servers: swaggerServers,
        schemes: swaggerSchemes,
        securityDefinitions: swaggerSecurityDefinitions,

        /* open api 3.0.0 version option */
        produces: swaggerProduces,
        components: {
          securitySchemes: swaggerSecurityScheme,
          schemas: swaggerComponents,
        },
        tags: swaggerTags,
      },
      apis: [],
    };
    this.#setUpOption = {
      // search
      explorer: true,
    };
  }

  addAPI(api) {
    this.#paths.push(api);
  }

  #processAPI() {
    const path = {};

    for (let i = 0; i < this.#paths.length; i += 1) {
      for (const [key, value] of Object.entries(this.#paths[i])) {
        path[key] = value;
      }
    }

    return path;
  }

  getOption() {
    const path = this.#processAPI();
    this.#option.definition.paths = path;

    return {
      apiOption: this.#option,
      setUpOption: this.#setUpOption,
    };
  }
}

module.exports = Swagger;
싱글톤 패턴?
이번 강의에 핵심이라 불리는 SwaggerHandler 파일입니다. docs/index.js에서 보내준 API 문서를 가공하는 역할을 합니다.
보시다시피 싱글톤 패턴으로 코드가 구성이되어있습니다. 왜 그럴까요? 싱글톤 패턴의 핵심 철학은 인스턴스를 2개 이상 만들지 말자입니다. 이 SwaggerHanlder 또한 두개 이상의 인스턴스를 만들시에는 문제가 생깁니다. 이유는 addAPI 메서드를 보시면 paths 라는 인스턴스 변수에 데이터를 push를 합니다. paths 인스턴스 변수를 배열로 하게된 이유는 나중에 설명하겠습니다. 만약 SwaggerHanlder를 2번 이상 인스턴스화를 하게되면 paths에 있던 데이터들은 사라지게 됩니다.
그렇게되면 마지막에 인스턴스화를 하고 addAPI를 통해 넣은 API 문서만 화면에 나오게 되죠, 이러한 불상사를 막기위해 싱글톤 패턴으로 구성을 했습니다. (자바를 하시던 분이라면 약간 이상한 코드라고 생각하시겠지만 넘어가주시면 감사하겠습니다. ^^7)
프로세스
싱글톤 패턴을 짠 이유를 설명 드렸으니 SwaggerHanlder 프로세스에 대해서 설명드리겠습니다.
1. API 문서 코드를 addAPI라는 메서드를 통해서 paths 인스턴스 변수에 저장
2. 클라이언트(여기서 클라이언트는 SwaggerHandler를 호출하는 곳입니다.)에서 getOption 메서드를 통해서 API option 데이터를 메서드 호출 시 processAPI 메서드가 JS 코드로 만들어진 API 문서를 가공합니다. 여기서 key 값이 docs/api/user/sigup.js에 있는 /user/sing-up 입니다. value는 당연히 아시죠?
3. 가공이 이뤄지면 가공이뤄진 데이터를 반환
router/index.js
const ApiDcos = require("../docs/index");

function getSwaggerOption() {
  const apiDocs = new ApiDcos();
  apiDocs.init();

  return apiDocs.getSwaggerOption();
}

/**
 *
 * @param {Express.Application} app
 */
module.exports = (app) => {
  const { swaggerUI, specs, setUpoption } = getSwaggerOption();

  app.use("/api-docs", swaggerUI.serve, swaggerUI.setup(specs, setUpoption));
};
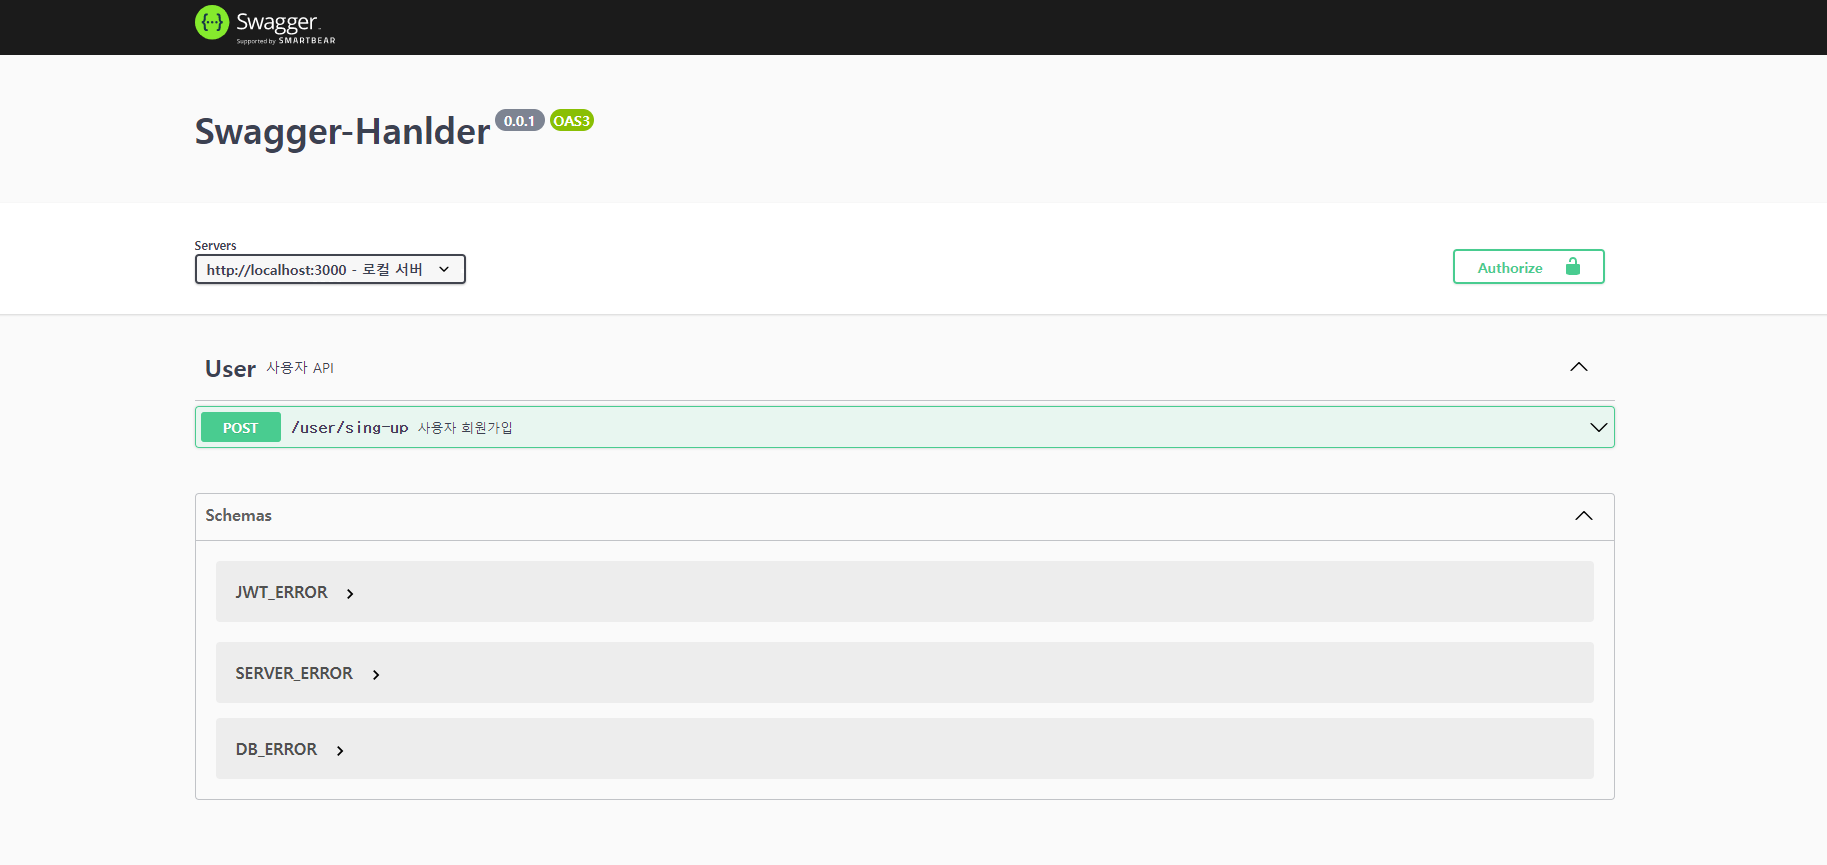
이젠 핵심 코드를 다 입력했으니 화면에 뿌리기만 하면 됩니다. 자 ApiDcos Class에서 옵션을 받은 후에
app.use 미들웨어로 화면에 나올 url과 차례대로 옵션을 넣으면

이렇게 화면에 나오게 됩니다.
controller 레벨에 API 문서 만들기
제가 SwaggerHanlder에 paths 인스턴 변수를 왜 배열로 만들었는지 이유를 말하겠습니다.
위 프로세스라면 paths라는 인스턴스 변수를 배열로 구성안하고 그냥 객체로 해도 됩니다.
왜냐하면 한꺼번에 객체가 오고 그거를 그냥 swagger paths 옵션에 넣어주기만 하면 되는데 배열로 만들고 그거를 가공해서 객체로 변경까지 왜 했을까요? 그 이유는 어느 레벨에서든 API 추가를 구성할 수 있게 만들기 위해서입니다. 지금은 따로 docs라는 폴더를 만들어서 API 문서를 만들지만 nest.js 에서처럼 controller 레벨에서 만들고싶을수도 있습니다.
그렇게 되면 paths 변수를 그냥 객체로는 어느 곳에서든 SwaggerHanlder addAPI 메서드를 실행했을 경우에는 추가가되지 않죠 그래서 싱글톤 + paths 변수를 배열로 한 이유입니다. 자 한번 controller 레벨에서 API 문서를 추가해 보죠.
router/user.js
const express = require("express");
const router = express.Router();
const Swagger = require("../handler/swagger");
const swagger = new Swagger();

swagger.addAPI({
  "/user/sing-in": {
    post: {
      tags: ["User"],
      summary: "사용자 로그인",
      description: "사용자 로그인(email, password, phone)",
      requestBody: {
        content: {
          "application/json": {
            schema: {
              properties: {
                email: {
                  type: "string",
                  description: "사용자 이메일",
                  example: "aaa@example.com",
                },
                phone: {
                  type: "string",
                  description: "사용자 전화번호",
                  example: "000-0000-0000",
                },
                password: {
                  type: "string",
                  description: "사용자 패스워드",
                  example: "123456789",
                },
              },
            },
          },
        },
      },
      responses: {
        201: {
          description: "사용자 로그인 성공",
          content: {
            "application/json": {
              schema: {
                type: "object",
                properties: {
                  result: {
                    type: "object",
                    properties: {
                      code: {
                        type: "number",
                        description: "code",
                        example: 201,
                      },
                      message: {
                        type: "string",
                        description: "성공 메시지",
                        example: "success",
                      },
                      data: {
                        type: "array",
                        description: "data",
                        example: [],
                      },
                    },
                  },
                },
              },
            },
          },
        },
      },
    },
  },
});
router.post("/sign-in", () => {});
router/index.js
const userAPI = require("../router/user"); // 추가
const ApiDcos = require("../docs/index");

function getSwaggerOption() {
  const apiDocs = new ApiDcos();
  apiDocs.init();

  return apiDocs.getSwaggerOption();
}

/**
 *
 * @param {Express.Application} app
 */
module.exports = (app) => {
  // router가 먼저 실행하기 때문에 위에서 실행해도 됨
  const { swaggerUI, specs, setUpoption } = getSwaggerOption();

  app.use("/user", userAPI); // 추가
  app.use("/api-docs", swaggerUI.serve, swaggerUI.setup(specs, setUpoption));
};
userAPI를 만들었으니 router/index.js 도 수정을 해야합니다.

어느 레이어 레벨에서든 어느 아키텍처든 SwaggerHanlder만 있다면 JS 코드로 정말 빠르고 쉽게 API 문서를 만들 수 있습니다. 많은 예제들에서 .yml으로 만들었다 해서 개발자 본인이 사용하기 불편하다면 당연히 소스코드를 까봐서 자기 입맛에 맞게 변형해야합니다. 만약 제 지금 코드도 불편하고 더 개선할 수 있다고 생각하시면 제 코드에서 더 확장 및 개선하셔도 된다는 말이죠, 그리고 JS 코드로 API 문서는 예제가 없기에 Swagger 공식 홈페이지에 가서 .yml으로 되어있는 예제를 마이그레이셔하면서 적용하면 됩니다.
감사합니다.
'프로그래밍 > Backend' 카테고리의 다른 글
| [Backend] 그런 에러 핸들링 아키텍처로 괜찮은가 (6) | 2022.01.25 |
|---|---|
| [Backend] Node.js 하위 폴더 읽기 및 파일 찾기 (3) | 2021.09.15 |
| [Backend] Nodejs router (2) | 2021.03.29 |
| [Backend] Nodejs ejs 적용 (2) | 2021.03.29 |
| [Backend] express routing 원리 (4) | 2021.03.14 |


댓글